GRG TAK Integration
Overview
Covers setting up a GRG (Grey Raven Group) ground control kit — a tablet-based GCS, network switch, and Doodle Labs Mesh Rider Radio — to forward MAVLink telemetry and RTSP video into MCHMR/TAK. The hardware and network setup closely mirrors SLM-10 TAK Integration (same IP scheme, same AG3/UAS Tool stack), but this guide additionally covers registering the tablet's ATAK with the TAK server using a kit-issued device (NPE) credential rather than a human login, and registering for a Tactical ID/MCHMR account. A condensed Quick Start flow for an already-configured kit is at the end, along with a full field Quick Reference.
Prerequisites
- The GRG kit: a GCS tablet, a network switch, a Doodle Labs Mesh Rider Radio, a power source, and a USB-C-to-ethernet dongle.
- ATAK, Auth Flow, Network Monitor, and UAS Tool installed on the tablet — or the thumb drive provided with the kit, to install whichever of these is missing.
- The kit's assigned NPE (device) credential for TAK server registration — username pattern
grg_tak.#.npe(the#is assigned per kit), password provided with the kit. - The radio's assigned gateway IP address, printed on the back of the radio.
- A Tactical ID/MCHMR account — see Tactical ID Registration below if you don't have one yet.
Steps
Part 1: Physical Setup
Step 1: Connect the hardware
- Set up the GCS tablet, network switch, and power source as shown below, and power everything on.
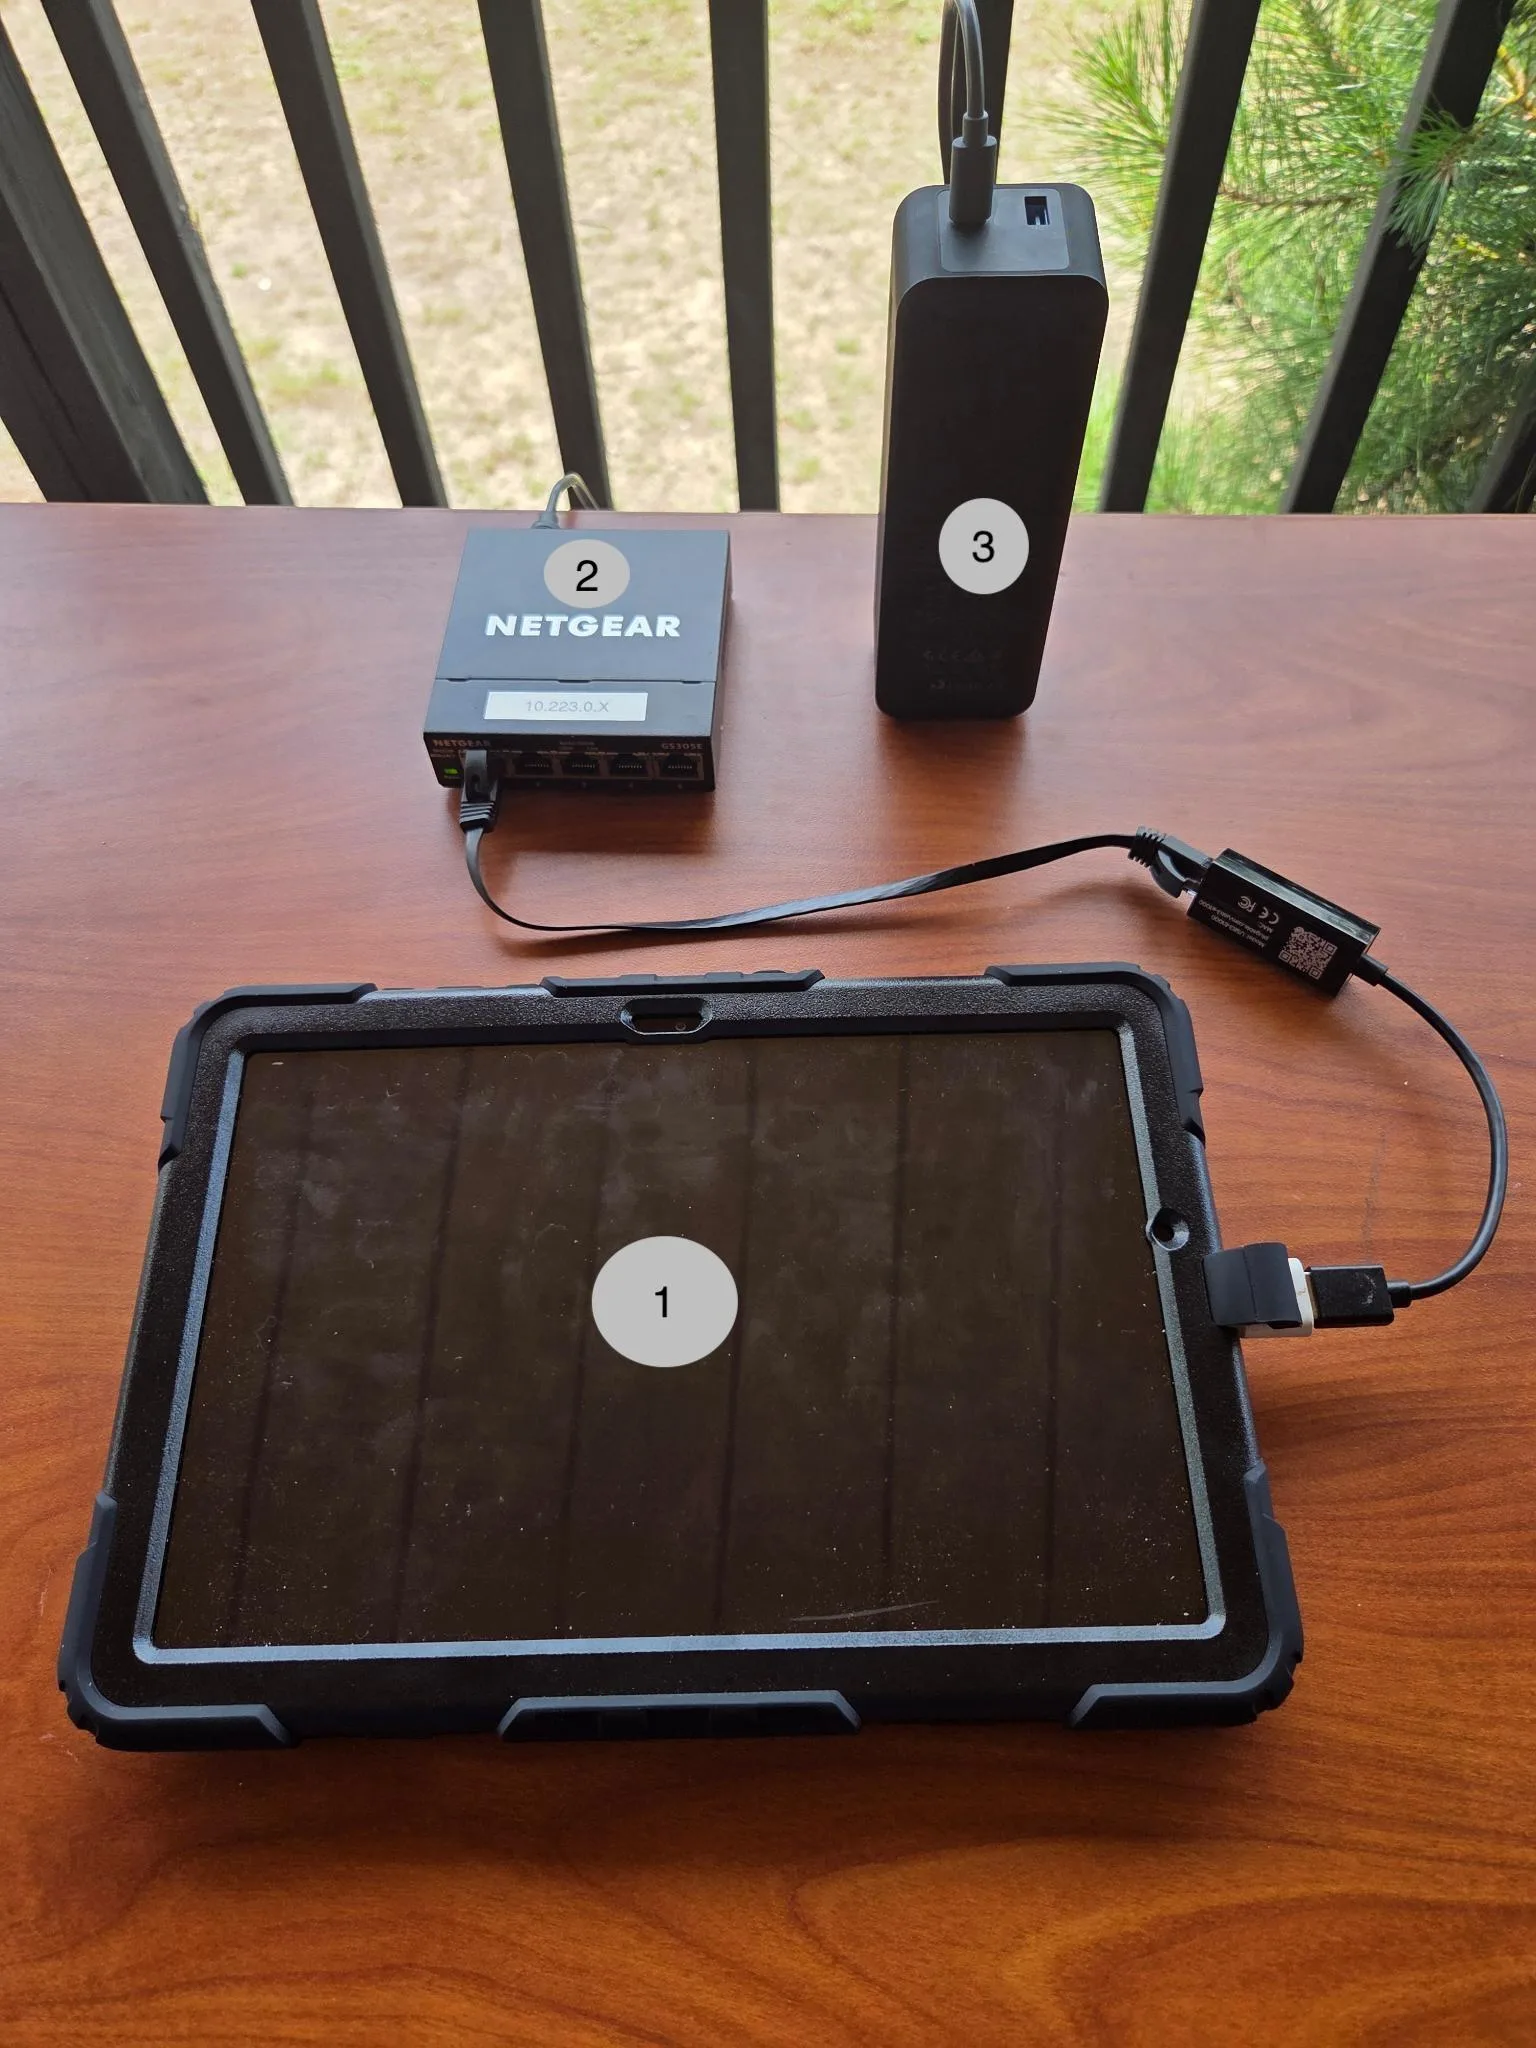
Part 2: Device Configuration
Step 2: Verify required apps are installed
- Open ATAK, tap the three lines in the top-right corner to open the menu, and scroll down to confirm Auth Flow, UAS Tool, and Network Monitor are all present. If any aren't listed, check the Plugins option — they may be there instead.
Step 3: Install anything missing
- If any of the four required apps (ATAK, Auth Flow, Network Monitor, UAS Tool) aren't installed, plug in the thumb drive provided with the kit, find the missing application on it, and install it.
Part 3: Network Configuration
Step 4: Configure the Network Monitor plugin (wired/ethernet)
-
Open Network Monitor and configure the network profile for ethernet: tap the three dots on the network entry, select View/Edit Configuration, and select Static Address. Set:
Setting Value IP Address The assigned device IP (e.g. 10.223.0.5)Subnet Mask 255.255.0.0Gateway The radio's own IP, printed on the back of the radio (e.g. 10.223.237.179)
Step 5: Configure WiFi settings
- Swipe down from the top-right corner, hold down on the WiFi entry, and select Details. It should already show as connected to
basestation#. Tap the settings cog next tobasestation#, tap View more, and change the IP address:10.223.1.101if monitoring10.233.1.100if flying — change it back to this value before flight
- Tap Save.
Open item — flagged, not guessed at: the source manual (
GRG User Docs.pdf) includes a separate "Configure Ethernet settings" section immediately after this one, but its steps are identical, word-for-word, to the WiFi steps above (same swipe-down/hold-on-wifi/Details/basestation# instructions) — this reads as a copy/paste artifact in the source document rather than a distinct Ethernet procedure. Not reproduced as a separate step here to avoid publishing duplicated or mislabeled instructions; confirm the real Ethernet-specific steps with Ben before this page goes live.
Part 4: ATAK — TAK Server Registration
This kit registers ATAK with the TAK server using a device (NPE) credential rather than a human login — a different flow from the existing AuthFlow Configuration module, which covers a person logging in. Both use the Auth Flow plugin, but this flow manually adds the server connection with a kit-issued client certificate rather than using Auth Flow's own Connect screen.
Step 6: Set the Auth Flow truststore
- Tap the three lines in the top-right corner, scroll down to Settings and select it, then go Tool Preferences → Specific Tool Preferences → Auth Flow → Select Truststore → Trust all certs.
Step 7: Add the server connection
- Back out to the home page, open the three-line menu, and select Auth Flow from there.
- Tap the home icon in the top-right corner, then go Network Preferences → Network Connection Preferences → Manage Server Connections.
- Tap the three vertical dots in the top-right corner, then Add, and enter:
- Name:
tak - Address:
tak.mchmr.us - Tap Use Authentication
- Username:
grg_tak.#.npe(the#is assigned per kit) - Password: provided with the kit
- Enable Enroll for Client Certificate
- Deselect Enroll with Preconfigured Trust
- Press OK
- Name:
Step 8: Confirm the connection
- Validate that the status icon turns green. Once it does, TAK server communications are enabled.
Part 5: AG3 Telemetry Configuration
Step 9: Enable MAVLink forwarding
- Tap the AG3 icon in the top-left corner, select Application settings → Telemetry, enable MAVLink Forwarding, and set Hostname to
localhost:14445.
Part 6: System Startup
Step 10: Power-on sequence
Once every configuration above is complete, power on the equipment in this order: 13. Power on the network switch. 14. Power on the GRG control tablet. 15. Connect the network switch to the GCS tablet with an ethernet cable, using a USB-C-to-ethernet dongle.
Part 7: UAS Tool — Add the Aircraft
Step 11: Configure the MAVLink platform
- Open the UAS Tool plugin in ATAK (three horizontal lines → UAS Tool Plugin), then tap the three horizontal bars in the top-right corner to open UAS Tool Settings. Select MAVLink Platform → Connection Settings, then set:
- Video Source Network Adapter: System Default
- MAVLink Network Protocol: UDP
- MAVLink Platform IP:
127.0.0.1 - Platform Port:
14445 - Local Port:
14445 - Serial Baud:
115200
- Press the back button to return to the home screen — the aircraft is now configured in ATAK.
Part 8: AG3 — Adding Drones
Step 12: Connect to the drone
- Open AG3, tap the AG3 icon in the top-left corner, select Application settings → Comm Links, and select Connect to Appropriate Drones (confer with the drone operator on which one).
- Tap Exit Application Settings in the top-left corner.
Tactical ID Registration
Tactical ID (formerly TIBA) is the identity and single sign-on layer used across MCHMR — register once at auth.mchmr.ai and that same account authenticates into WinTAK, WebTAK, Compass, and the rest of the connected toolset. Use the training that matches your situation:
- CAC/EDIPI usable on this endpoint — DoW User Login/Registration.
- CAC/EDIPI not usable on this endpoint — Manual CAC Registration.
- No CAC/EDIPI — Coalition Partner Registration (foreign/coalition personnel) or Non-Mil Partner Registration (United States) (US-based non-military partners).
See the Tactical ID module index for the full registration, login, and account-management reference.
Pre-Mission Checklist
ATAK Device
- Network Monitor plugin installed
- Network Monitor configured
- Video broadcast settings configured
- MAVLink settings configured
GCS AMC App
- Advanced Mode enabled
- Controller IP identified
- Video destination configured
- MAVLink destination configured
System
- Doodle Labs radio powered on
- Network switch power connected
- Ethernet cables plugged into switch
- UAS added in ATAK
- Telemetry forwarded to TAK server
- Video received from GCS
- Compass server broadcast active
The source manual's System checklist also includes an "SLM-10 powered on" line — presented as its own listing in the source rather than dropped, but likely carried over from the SLM-10 kit's own checklist rather than written specifically for GRG. Worth confirming with Ben whether that line applies here or should read something else (e.g. the GRG aircraft/payload itself).
Quick Reference (Cutsheet)
A full field walkthrough of the same procedure above, as a single reference sheet:
- On the ATAK EUD, install Network Monitor and UAS Tool via Watchtower.
- In Network Monitor, configure WiFi with a static address based on the current transport (e.g. on a
192.168.1.0Starlink network: IP192.168.1.25(arbitrary), subnet mask255.255.0.0, gateway192.168.1.1). - Configure the wired connection: IP
10.223.0.5, subnet mask255.255.0.0, gateway = the radio's IP, printed on the radio (e.g.10.223.234.175). - Open Auterion Mission Control (AMC) on the GCS and tap the upper-left corner 7 times until prompted to enter Advanced Mode; select OK.
- Open the extended menu in the upper-left corner and select Settings.
- Tap General, then scroll down to the video section.
- Fill in the video proxy setting:
rtp://10.223.0.5:8554/live. - Tap MAVLink on the left and check the box to enable MAVLink forwarding.
- Set the hostname to
10.223.0.5:14445. - Open ATAK on the MCHMR EUD.
- Confirm the UAS Tool is loaded — open the extended menu (if it's not there, open Plugins, rescan with the blue arrows in the upper-right corner, and scroll down to see if the box is checked, indicating the UAS Tool is loaded).
- Open the UAS Tool and tap the settings button in the upper-right corner.
- Select Video Broadcast (size and bitrate per network capabilities).
- Video Broadcast Destination: RTSP.
- Video Destination IP:
compass.mchmr.us. - Video Destination Port:
554. - Video Broadcast Identifier:
[callsign]/group/AFCENT— e.g.ambush/group/AFCENT. - Verify the P2P checkbox is unchecked (a checked box shows as a
?in the resulting link). - Scroll to the bottom to confirm the Video Observer URL has populated — it builds itself automatically from the settings above.
- Tap the back button.
- Scroll down and select the MAVLink platform.
- Camera settings — Video Source URI:
rtp://0.0.0.0:8554/live. - Back out to the UAS Tool's main screen.
- Tap the + button and set Local Port to
14445. - Confirm the Video Source URI matches
rtp://0.0.0.0:8554/liveand tap OK. - Tap the play button to connect, tap the wrench icon, then tap the play button again to broadcast.
- The feed is now being pushed to
compass.mchmr.us.
Quick Start (Sustainment Use)
Once a kit has been fully configured and tested using the steps above, use this condensed flow for routine launches:
- Plug the power cords for the radio and switch into the power bank, then into the radio and switch.
- Plug in three ethernet cables to the switch — one to the GCS, one to an ethernet dongle, and one to the Doodle Labs Mesh Rider Radio.
- Plug a USB-A-to-USB-C (OTG) adapter into the ethernet dongle, then plug the OTG end into the EUD.
- Power on the EUD (loaded with ATAK), then power on the GCS.
- Open AMC on the GCS.
- Open ATAK on the Android EUD.
- Open the UAS Tool plugin in ATAK.
- Tap the + and verify the quick configuration settings: MAVLink
14445, Videortp://0.0.0.0:8554/live. - Tap the play button on the ATAK EUD.
- Tap Fly on the GCS.
This procedure is complete once all of the following are true:
- Network Monitor's wired and WiFi connections both show active
- Auth Flow's status icon shows green (TAK server communications enabled)
- The UAS Tool's Video Observer URL has auto-populated
- Video and telemetry are both confirmed flowing to
compass.mchmr.usand the TAK server
Troubleshooting
The source manual's Troubleshooting section was left blank — no scenarios were documented for GRG specifically. Given the overlapping hardware/software stack, SLM-10 TAK Integration's Troubleshooting section may apply here too (e.g. a ? in the Video Observer URL meaning the P2P checkbox is checked), but this isn't confirmed against GRG's own kit — flag any GRG-specific issues to Ben as they come up.
Glossary
| Term | Definition |
|---|---|
| UAS | Unmanned Aircraft System |
| AMC | Auterion Mission Control |
| ATAK | Android Tactical Assault Kit |
| GCS | Ground Control Station |
| GRG | Grey Raven Group |
| MCHMR | MANET-Cloud High-Mobility Radio |
| MDM | Mobile Device Manager |
The source manual's own glossary lists this entry as "GCG: Grey Raven Group" rather than "GRG" — presented above as GRG to match the document's title and the rest of its content; flagged as a likely typo in the source rather than corrected silently.